Thursday, February 8, 2018

UCS Direct Attached Storage and FC Zoning Configuration Example

Introduction

This document provides a sample configuration of Direct Attached Storage (DAS) in the Cisco Unified Computer System (UCS); the configuration uses the graphical user interface (GUI) available in the UCS Manager (UCSM).
With the release of UCS version 2.1, it is now possible to connect the storage array directly to the Fabric Interconnect (FI) without any upstream storage area network (SAN) switch.

Prerequisites

Requirements

Cisco recommends that you have knowledge of these topics:
  • UCS and UCS Manager Knowledge
  • Storage Area Networking
  • Fiber Channel Zoning Concepts

Components Used

The information in this document is based on these software and hardware versions:
  • UCS setup with FI in fiber channel (FC) switch mode and with firmware version 2.1(1a) or later.
  • Storage array that supports UCS. Refer to UCS - Storage Interoperability Matrix for list of supported storage arrays.
The information in this document was created from the devices in a specific lab environment. All of the devices used in this document started with a cleared (default) configuration. If your network is live, make sure that you understand the potential impact of any command.

Conventions

Refer to Cisco Technical Tips Conventions for information on document conventions.

Background Information

UCS with DAS Earlier than Version 2.1

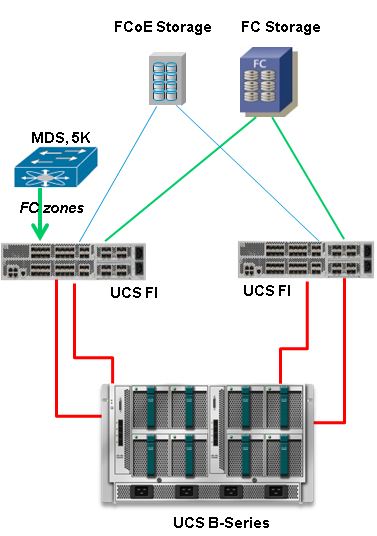
In versions of UCS earlier than 2.1, you had the option to use DAS with UCS. However, you needed a SAN switch connected to the FI so the switch could push the zone database to the FI. That is, the UCS platform was not able to build a zone database. The topology was similar to this:


UCS with DAS in Version 2.1

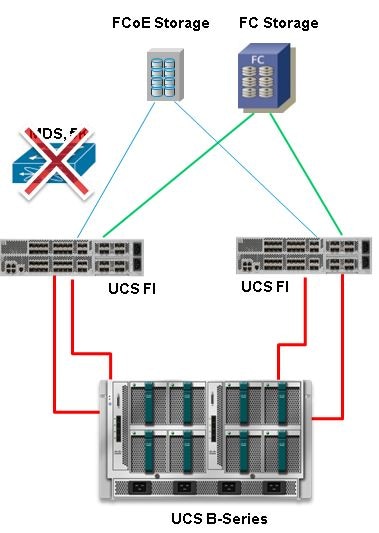
With the release of Version 2.1, UCS now has the ability to build its own zone database. You can have DAS with UCS without the need for a SAN switch to push the zoning configuration. The topology now looks like this:
Configure

Configure Direct Attached Storage

The general process to configure DAS in UCS is:
  1. Configure FI in FC switch mode.
  2. Create required virtual SAN (VSAN).
  3. Set the port role in UCS.
  4. Check if the storage port worldwide port name (WWPN) is logged in to the fabric.
This assumes the physical cables are already connected between the storage array ports and the Fabric Interconnects.
Each of these steps is explained in detail in the next sections.

Configure FI in FC Switch Mode

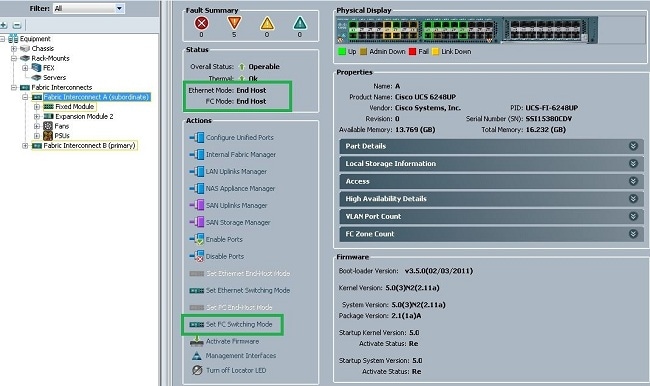
If the FI is not already in FC switch mode, this procedure demonstrates how to change to that mode. You can still run End Host Mode for the Ethernet.
Note: This activity requires an FI reboot.
  1. In the UCSM, navigate to and click the Equipment tab.
  2. Expand Fabric Interconnects.
  3. Click Fabric Interconnect A.
  4. In the right pane, select Set FC Switching Mode.
  5. Repeat Steps 1-4 for Fabric B.

Create Required VSAN

This procedure demonstrates how to create the required VSANs in both FIs and how to enable zoning on the VSANs. Before you start this procedure, identify which VSAN ID you want to use for both fabrics.
Note: Storage VSANS should be created only under Storage Cloud and should not be allowed in the FC uplinks if any.
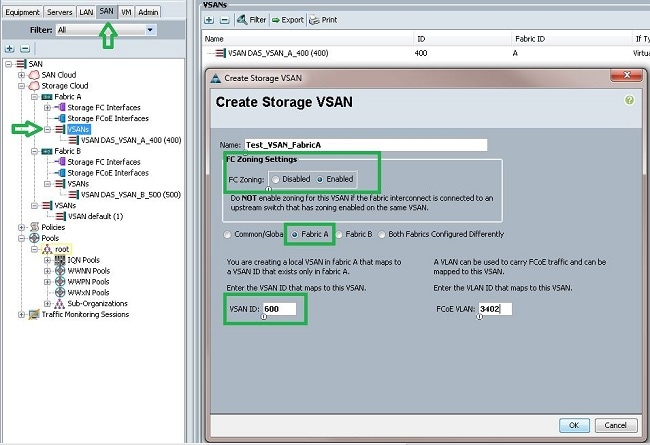
  1. In the UCSM, navigate to and click the SAN tab.
  2. Expand Storage Cloud.
  3. Expand Fabric A.
  4. Right-click VSANs, and select Create Storage VSAN.
  5. Enter a name for the VSAN.
  6. Select Enabled for FC Zoning.
  7. Select Fabric A.
  8. Enter the VSAN ID and a Fiber Channel over Ethernet (FCoE) VLAN ID for Fabric A. Make sure that FCoE VLAN ID is a VLAN ID that is not currently used in the network.
  9. Repeat Steps 1-8 for Fabric B.

Set the Port Role in UCS

This procedure demonstrates how to select the FI ports connected to the storage array and how to configure them as FC Storage Ports.
  1. In the UCSM, navigate to and click the Equipment tab.
  2. Expand Fabric Interconnects.
  3. Expand Fabric Interconnect A.
  4. Right-click the port connected to the storage array, and select Configure as FC Storage Port.
  5. Select the correct VSAN for this port in the right pane.
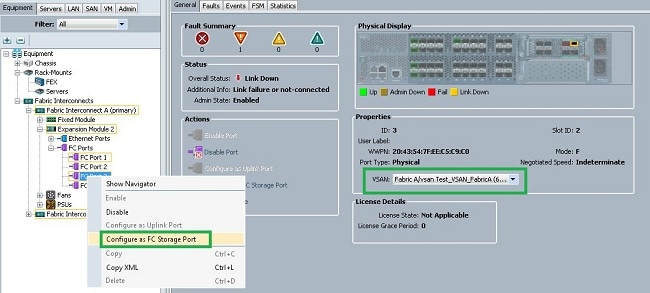
  6. Repeat steps 1-6 for Fabric B.
If the port is configured properly and is up in the storage array, the FC Storage port in UCS should come online.

Confirm StoragePort WWPN Is Logged in to the Fabric

This procedure ensures that the storage port WWPN is logged in to the fabric.
  1. Log in through the secure shell (SSH), or establish a Telnet connection to the UCS Virtual IP (VIP).
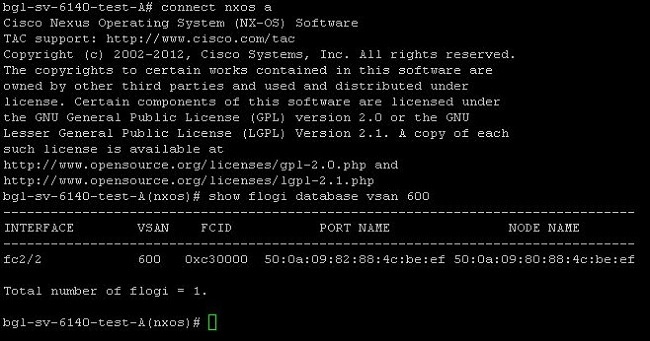
  2. Enter the connect nxos { a | b } command, where a | b represents FI A or FI B; in this example, the FI is A.
  3. Enter the show flogi database vsan vsan ID command, where vsan ID is the identifier for the VSAN; in this example, the identifier is 600.
This image is an example of output from these two commands. The storage port WWPN is now logged in to VSAN 600. Be sure to confirm the storage port login on both of the fabrics.
Configure FC Zoning

The general process to configure the server is:
  1. Create storage connection policy.
  2. Create a service profile.
  3. Associate the service profile with the server.
Each of these steps is explained in detail in the next sections.

Create Storage Connection Policy

This procedure demonstrates how to create the storage connection policy and the storage target WWPN.
Note: Cisco recommends that you create one policy for each fabric so the zoning is easy to understand.
  1. In the UCSM, navigate to and click the SAN tab.
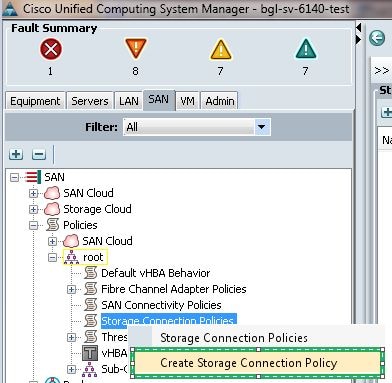
  2. Expand Policies, expand Root, right-click Storage Connection Policies, and select Create Storage Connection Policy.


    The Create Storage Connection Policy window opens and allows you to define the storage target WWPN and the fabric details.
  3. Enter a Name for the storage connection policy.
  4. Select a Zoning Type from the three options:
    • None: Use this option when you do not have the zones created in the FI, but do have zones used from the upstream FC switch for a particular VSAN.
    • Single Initiator Single Target: Use this option when you have only one storage port connected to one fabric. In this example, there is one target connected to each fabric.
    • Single Initiator Multiple Targets: Use this option when you have more than one storage port connected to one fabric.
  5. Click the plus (+) sign next to the FC Target Endpoints section. The Create FC Target Endpoint window opens.
  6. Enter the WWPN of the FC target.
  7. Click the Path for the fabric.
  8. Select the VSAN ID from the drop-down list.
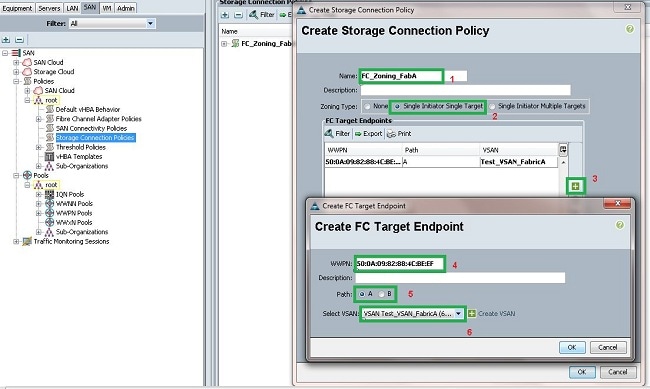
  9. Click OK in order to save the changes.

Create Service Profile

This procedure demonstrates how to create a regular service profile with additional zoning configuration.
  1. In the UCSM, navigate to and click the Servers tab.
  2. Expand Servers, right-click Service Profiles, and select Create Service Profile(expert).
  3. Enter a name for the service profile, and select the unique identifier (UUID) pool that you already created. Click Next.
  4. In the Networking section, create the required number of virtual network interface controllers (vNICs). Click Next.
  5. In the Storage section, create the required number of virtual host bus adapters (vHBAs), and make sure that you place them in the correct VSAN for storage connectivity. This example uses VSAN 600. Click Next.
  6. In the Zoning section (which is new in UCSM 2.1), select the vHBA and the Storage Connection Policy mapping in order to define the zoning. Under Select vHBA Initiators, click vHBA. Under the Select vHBA Initiator Groups section, click the plus (+) sign in order to open a new window.
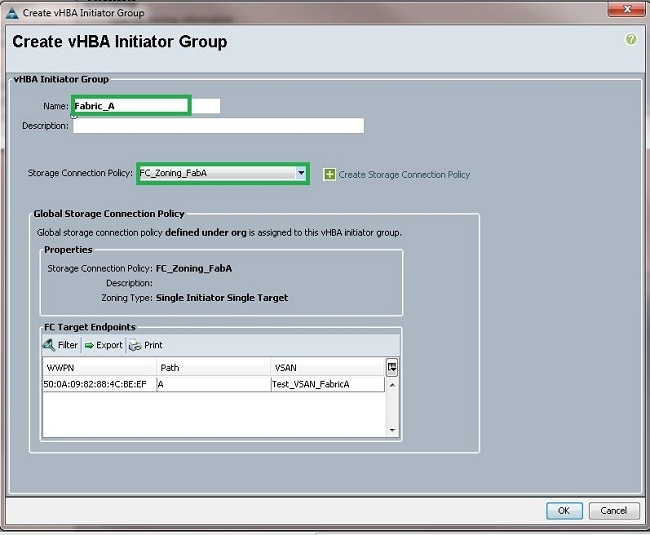
  7. Enter a Name for the Initiator Group, select the Storage Connection Policy you created previously, and click OK.


    The Zoning window appears.
  8. In the left pane, click the vHBA to add to the initiator group. In the right pane, click the vHBA Initiator Group you created. Then, click the Add To button between the panes in order to add that vHBA to that Initiator Group. The vHBA becomes part of the Initiator Group and is zoned with the Storage Target mentioned in the Storage Connection Policy.
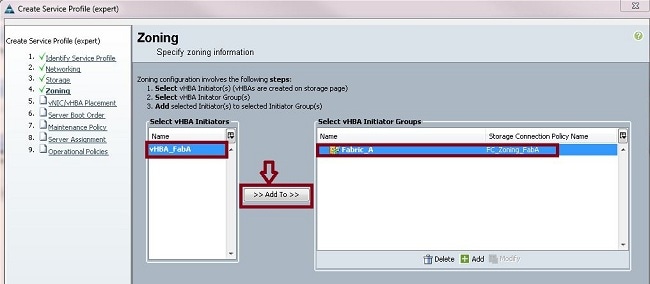
    Note: You can add multiple vHBAs under one vHBA initiator group. You can also create different initiator groups for the different fabrics in order to ease management.

  9. Click Next from the Zoning section, and complete the other sections in the service profile.

Associate Service Profile with the Server

This procedure demonstrates how to associate the service profile with the server, which initiates the creation of zones and the zoneset.
  1. Right-click the service profile you just created, and click Change Service Profile Association.
  2. Select Select Existing Server from the drop-down list.
  3. Select the appropriate server, and click OK. The server then reboots.

Verify

Use this section to confirm that your zone creation and zoneset activation work properly.
The Cisco CLI Analyzer (registered customers only) supports certain show commands. Use the Cisco CLI Analyzer in order to view an analysis of show command output.

Verify from GUI

This procedure describes how to verify the zone configuration and zoneset activation from the GUI.
  1. In the UCSM, navigate to and click the Servers tab.
  2. Expand Servers and Service Profiles.
  3. Navigate to and click the service profile you created previously.
  4. Click the FC Zones tab in the right pane.
In this image, the initiator and target WWPN are in the same zone. The zone Admin State is Applied, and the Oper State is Active, which means the zone is part of the current active zoneset.

Note: The zone name is automatically created; you do not have any control over the name. In this example, the naming convention is ClusterName_FabricID_ZoneID_ServiceProfileName_InitiatorName.

Verify from CLI

This procedure connects to the NXOS shell of the UCS and verifies the zoning from the command-line interface.
  1. Log in through the secure shell (SSH) to the UCS VIP.
  2. Enter the connect nxos { a | b } command, where a | b represents FI A or FI B; in this example, the FI is A.
  3. Enter the show zoneset active vsan vsan ID command, where vsan ID is the identifier for the VSAN; in this example, the identifier is 600.
This image is an example of output from these two commands.
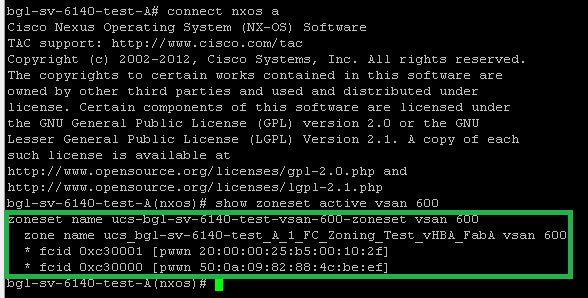
If the proper logical unit number (LUN) masking is done from the storage side, the LUN is now visible in the server OS.

Troubleshoot

This section provides information you can use to troubleshoot your configuration.
If you have created the service profile, but cannot see the zones under the FC Zones tab, use this troubleshooting checklist:
  • Is the zoning enabled on the intended VSAN?
  • Is the service profile associated? Zones are created only when the service profile is associated with the server.
  • Is the correct storage connection policy selected under vHBA initiator groups?
  • Is the correct VHBA added to the correct vHBA initiator group?
  • Is the correct VSAN selected for the vHBAs?
  • Are the correct VSAN and fabric selected under the storage connection policy?

Related Information

Wednesday, October 4, 2017

Cisco NX-OS/IOS Comparison Tech Notes

Cisco Nexus 7000 NX-OS/IOS Comparison Tech Notes

Cisco Nexus switches use the Cisco NX-OS Software. These comparisons are based on Cisco Nexus 7000 switches.

The following article compares default configuration differences between Cisco NX-OS Software and Cisco IOS Software.
  • Cisco NX-OS/IOS Software Default Configuration Differences
  • Catalyst 6500 IOS to NxOS Migration tool

The following articles compare Cisco NX-OS Software with Cisco IOS Software for common features:
  • Cisco NX-OS/IOS Configuration Fundamentals Comparison
  • Cisco NX-OS/IOS BGP (Basic) Comparison
  • Cisco NX-OS/IOS BGP (Advanced) Comparison
  • Cisco NX-OS/IOS DHCP Relay Comparison
  • Cisco NX-OS/IOS EIGRP Comparison
  • Cisco NX-OS/IOS HSRP Comparison
  • Cisco NX-OS/IOS Interface Comparison
  • Cisco NX-OS/IOS Layer-3 Virtualization Comparison
  • Cisco NX-OS/IOS Multicast Comparison
  • Cisco NX-OS/IOS Netflow Comparison
  • Cisco NX-OS/IOS OSPF Comparison
  • Cisco NX-OS/IOS Port-Channel Comparison
  • Cisco NX-OS/IOS SPAN Comparison
  • Cisco NX-OS/IOS STP Comparison
  • Cisco NX-OS/IOS TACACS+, RADIUS, and AAA Comparison

Cisco NX-OS/IOS BGP (Basic) Comparison

Objective
This tech note outlines the main differences in Border Gateway Protocol support between Cisco® NX-OS Software and Cisco IOS® Software. Sample configurations are included for the Cisco NX-OS and Cisco IOS Software for some common features to demonstrate the similarities and differences. Please refer to the NX-OS documentation on Cisco.com for a complete list of supported features.

BGP Overview
BGPv4 is a standard Exterior Routing Protocol defined in RFC 4271, commonly used to exchange network reachability information between autonomous systems. This document covers the features required for basic connectivity.

Important Cisco NX-OS and Cisco IOS Software Differences
In Cisco NX-OS:
  • BGP CLI configuration and verification commands are not available until you enable the BGP feature with the feature bgp command.
  • The BGP protocol requires an Enterprise Services license.
  • Autonomous system numbers can be configured as 16 or 32 bit values.
  • Address families need to be explicitly enabled (IE: IPv4 unicast, IPv6 unicast, etc…). All address families are disabled by default.
  • By default, eBGP supports 8 Equal Cost Paths and iBGP supports 1. The Cisco NX-OS supports up to 16 Equal Cost Paths for both eBGP and iBGP.
  • Automatic Route Summarization and Synchronization are disabled by default.
  • BGP consists of a hierarchical configuration based on neighbors and address families.
  • If a router ID is not manually configured, the loopback 0 IP address is always preferred. If loopback 0 does not exist, Cisco NX-OS selects the IP address for the first loopback interface in the configuration. If no loopback interfaces exist, Cisco NX-OS selects the IP address for the first physical interface in the configuration.
  • Neighbor logging is not enabled by default under the BGP instance. Neighbor logging can be enabled with the log-neighbor-changes command.
  • When neighbor authentication is configured, the BGP key is 3DES encrypted in the configuration. Cisco IOS Software requires the service password command to encrypt the password in the configuration.

Things You Should Know
The following list provides some additional facts about Cisco NX-OS that should be helpful when designing, configuring, and maintaining a BGP network.

  • One BGP instances can be configured per Virtual Device Context (VDC).
  • Numerous Virtual Route Forwarding (VRF) instances can be associated to a BGP instance.
  • If the feature bgp command is removed, all relevant BGP configuration information is also removed.
  • Network statements must be configured under their respective address-family configuration mode when advertising them via BGP.
  • The shutdown command under the BGP instance can be used to disable BGP while retaining the configuration.
  • The show running-config bgp command displays the current BGP configuration.
  • A BGP instance can be restarted with the restart bgp <instance #> command.
  • Graceful Restart (RFC 3623) is enabled by default.

Configuration Comparison
The following sample configuration code similarities and differences between the Cisco NX-OS and Cisco IOS Software CLIs. There are three significant differences: The Cisco NX-OS allows BGP to be enabled and disabled globally. It utilizes a hierarchical configuration that makes it easier to read. The Cisco NX-OS does not enable any address families by default. Each address-family needs to be explicitly enabled. The following examples demonstrate this using the IPv4 unicast address family.

Cisco IOS CLICisco NX-OS CLI
Enabling the BGP Feature
Cisco IOS Software does not have the functionality to enable or disable BGP.feature bgp
Configuring a BGP Instance and Router ID
router bgp 10
bgp router-id 192.168.1.1
router bgp 10
router-id 192.168.1.1
Configuring a BGP Neighbor (Internal)
router bgp 10
neighbor 192.168.2.1 remote-as 10
neighbor 192.168.2.1 update-source Loopback0
router bgp 10
neighbor 192.168.2.1 remote-as 10
update-source loopback0
address-family ipv4 unicast
Configuring a BGP Neighbor (External)
router bgp 10
neighbor 192.168.10.2 remote-as 11
router bgp 10
neighbor 192.168.10.2 remote-as 11
address-family ipv4 unicast
Advertising a Network in an Address Family (IPv4)
router bgp 10
network 159.142.1.0 mask 255.255.255.0
network 159.142.254.0 mask 255.255.255.0
neighbor 192.168.10.2 remote-as 11
router bgp 10
address-family ipv4 unicast
network 159.142.1.0/24
network 159.142.254.0/24
neighbor 192.168.10.2 remote-as 11
address-family ipv4 unicast
Configuring Neighbor Authentication (MD5)
router bgp 10
neighbor 192.168.10.2 remote-as 11
neighbor 192.168.10.2 password cisco123
router bgp 10
neighbor 192.168.10.2 remote-as 11
password 3 a667d47acc18ea6b
address-family ipv4 unicast
Configuring an Aggregate Address (Summary-Only)
router bgp 10
network 159.142.1.0 mask 255.255.255.0
network 159.142.254.0 mask 255.255.255.0
aggregate-address 159.142.0.0 255.255.0.0 summary-only
neighbor 192.168.10.2 remote-as 11
router bgp 10
address-family ipv4 unicast
network 159.142.1.0/24
network 159.142.254.0/24
aggregate-address 159.142.0.0/16 summary-only
neighbor 192.168.10.2 remote-as 11
address-family ipv4 unicast
Generating a Default Route for a Neighbor
router bgp 10
neighbor 192.168.10.2 remote-as 11
neighbor 192.168.10.2 default-originate
router bgp 10
neighbor 192.168.10.2 remote-as 11
address-family ipv4 unicast
default-originate


Verification Command Comparison
The following table compares some useful show commands for verifying and troubleshooting a BGP network configuration.

Cisco NX-OS BGPCisco IOS Software BGPCommand Description
show bgp convergence-Displays global convergence information
show bgp process-Displays global BGP process information
show bgp sessions-Displays information for all neighbors
show bgp statistics-Displays global BGP process statistics
---
show ip bgp <option>show ip bgpDisplays BGP Process and BGP table entries
show ip bgp x.x.x.xshow ip bgp x.x.x.xDisplays a specific network in the BGP table
show ip bgp x.x.x.x vrf-Displays a network in a specified VRF BGP table
show ip bgp x.x.x.x/lenshow ip bgp x.x.x.x maskDisplays a specific prefix in the BGP table
show ip bgp x.x.x.x/len longer-prefixshow ip bgp x.x.x.x mask longer-prefixDisplays a prefix in the table with longer prefixes
show ip bgp allshow ip bgp allDisplays the BGP table for all protocol families
show ip bgp community <word>show ip bgp community <#>Displays routes with a specific regular expression
show ip bgp community <aa:nn>-Displays routes with a specific community value
show ip bgp community internet-Displays BGP routes advertised to the Internet
show ip bgp community no-advertiseshow ip bgp community no-advertiseDisplays BGP routes not advertised to peers
show ip bgp community no-exportshow ip bgp community no-exportDisplays BGP routes not exported to next AS
show ip bgp community no-export-spoofed-Displays BGP routes not sent to outside local AS
show ip bgp community-list <name>show ip bgp community-list <name>Displays a specific BGP community list
show ip bgp dampening dampened-pathsshow ip bgp dampening dampened-pathsDisplays all Dampened paths
show ip bgp dampening flap-statisticsshow ip bgp dampening flap-statisticsDisplays flap statistics for BGP routes
show ip bgp dampening history-paths-Displays all history paths
show ip bgp dampening parametersshow ip bgp dampening parametersDisplays all of the Dampening parameters
show ip bgp extcommunity <word>-Displays routes with a specific regular expression for extended communities
show ip bgp extcommunity-list <name>-Displays a specific BGP extended community list
show ip bgp filter-listshow ip bgp filter-listDisplays all routes matching a specified filter list
show ip bgp flap-statistics-Displays all BGP route flap statistics
show ip bgp ipv4 multicast <option>show ip bgp ipv4 multicast <option>Displays BGP IPv4 multicast address families
show ip bgp ipv4 unicast <option>show ip bgp ipv4 unicast <option>Displays BGP IPv4 unicast address families
show ip bgp neighborsshow ip bgp neighborsDisplays detailed neighbor information
show ip bgp neighbors x.x.x.xshow ip bgp neighbors x.x.x.xDisplays detailed information for a neighbor
show ip bgp nexthop x.x.x.x-Displays all routes matching a specified next-hop
show ip bgp nexthop-database-Displays the next-hop database
show ip bgp pathsshow ip bgp pathsDisplays all BGP paths
show ip bgp peer-policy-Displays BGP peer policy by specified name
show ip bgp peer-session-Displays information about a peer session
show ip bgp peer-templateshow ip bgp unicast ipv4 templateDisplays information about a peer template
show ip bgp prefix-listshow ip bgp prefix-listDisplays routes matching a specified prefix-list
show ip bgp regexpshow ip bgp regexpDisplays routes matching a regular-expression
show ip bgp received-paths-Displays the paths stored for soft reconfiguration
show ip bgp route-mapshow ip bgp route-mapDisplays BGP routes matching a route-map
show ip bgp summaryshow ip bgp summaryDisplays a summary list of neighbors and statistics
show ip bgp vrfshow ip bgp vpnv4 vrfDisplays information for a specified BGP VRF