Saturday, December 31, 2022

Few Strategies for Making Better Group Decisions

 When it comes to solving tough business problems, you likely bring it to core group. After all, more minds are better than one, right? may be not. Larger pools of knowledge are by no means a guarantee of better outcomes. Because of an over-reliance on hierarchy, an instinct to prevent dissent, and a desire to preserve harmony, many groups fall into groupthink

Misunderstood expert opinions can quickly distort a group decision. Individual biases can easily spread across the group and lead to outcomes far outside individual preferences. And most of these processes occur subconsciously. This doesn’t mean that groups shouldn’t make decisions together, but you do need to create the right process for doing so. Based on behavioral and decision science research and years of application experience, we have identified seven simple strategies for more effective group decision making:

Keep the group small when you need to make an important decision. Large groups are much more likely to make biased decisions. For example, research shows that groups with seven or more members are more susceptible to confirmation bias. The larger the group, the greater the tendency for its members to research and evaluate information in a way that is consistent with pre-existing information and beliefs. By keeping the group to between three and five people, a size that people naturally gravitate toward when interacting, you can reduce these negative effects while still benefitting from multiple perspectives.

Choose a heterogenous group over a homogenous one (most of the time). Various studies have found that groups consisting of individuals with homogeneous opinions and beliefs have a greater tendency toward biased decision making. Teams that have potentially opposing points of view can more effectively counter biases. However, context matters. When trying to complete complex tasks that require diverse skills and perspectives, such as conducting research and designing processes, heterogeneous groups may substantially outperform homogeneous ones. But in repetitive tasks, requiring convergent thinking in structured environments, such as adhering to safety procedures in flying or healthcare, homogenous groups often do better. As a leader, you need first to understand the nature of the decision you’re asking the group to make before you assemble a suitable team.

Appoint a strategic dissenter (or even two). One way to counter undesirable groupthink tendencies in teams is to appoint a “devil’s advocate.” This person is tasked with acting as a counterforce to the group’s consensus. Research shows that empowering at least one person with the right to challenge the team’s decision making process can lead to significant improvements in decision quality and outcomes. For larger groups with seven or more members, appoint at least two devil’s advocates to be sure that a sole strategic dissenter isn’t isolated by the rest of the group as a disruptive troublemaker.

We Collect opinions independently. The collective knowledge of a group is only an advantage if it’s used properly. To get the most out of your team’s diverse capabilities, we recommend gathering opinions individually before people share their thoughts within the wider group. You can ask team members to record their ideas independently and anonymously in a shared document, for example. Then ask the group to assess the proposed ideas, again independently and anonymously, without assigning any of the suggestions to particular team members. By following such an iterative process teams can counter biases and resist groupthink. This process also makes sure that perceived seniority, alleged expertise, or hidden agendas don’t play a role in what the group decides to do.

We can Provide a safe space to speak up. If you want people to share opinions and engage in constructive dissent, they need to feel they can speak up without fear of retribution. Actively encourage reflection on and discussion of divergent opinions, doubts, and experiences in a respectful manner. There are  three basic elements required to create a safe space and harness a group’s diversity most effectively. First, focus feedback on the decision or discussed strategy, not on the individual. Second, express comments as a suggestion, not as a mandate. Third, express feedback in a way that shows you empathize with and appreciate the individuals working toward your joint goal.

We Don’t over-rely on experts. Experts can help groups make more informed decisions. However, blind trust in expert opinions can make a group susceptible to biases and distort the outcome. Research demonstrates that making them part of the decision-making can sway the team to adapt their opinions to those of the expert or make overconfident judgments. Therefore, invite experts to provide their opinion on a clearly defined topic, and position them as informed outsiders in relation to the group.

We Share collective responsibility. Finally, the outcome of a decision may be influenced by elements as simple as the choice of the group’s messenger. We often observe one single individual being responsible for selecting suitable group members, organizing the agenda, and communicating the results. When this is the case, individual biases can easily influence the decision of an entire team. Research shows that such negative tendencies can be effectively counteracted if different roles are assigned to different group members, based on their expertise. Moreover, all members should feel accountable for the group’s decision making process and its final outcome. One way to do that is to ask the team to sign a joint responsibility statement at the outset, leading to a more balanced distribution of power and a more open exchange of ideas.

Following these steps doesn’t guarantee a great decision. However, the better the quality of the decision-making process and the interaction between the group members, the greater your chances of reaching a successful outcome.

It can be really intimidating to make good decisions when you're leading today's complex teams. By complex, I mean you have team members with different expertise or sometimes even different geographic locations, sometimes shifting team members. So it's messy. But still you have to make the decisions, and you have to make them knowing that they may not be perfect.

Don't worry. You can help your team make a good decision if you follow a few simple best practices, and these best practices will help you overcome some of the pitfalls of diverse complex teams. So for instance, one pitfall is what's called the common information effect. Now this happens when diverse experts come together to make a decision, and they all bring different pieces of the puzzle. What happens, inexplicably in a way, is that they end up spending all their time talking about the common information, that little bit of information that everybody knew on the way in rather than sharing their unique bits of information.

Quite often, making a good decision requires using that unique information. This, of course, can be overcome with good leadership, with the ability to lead a good decision--making process. A few best practices: start with really inviting people one voice at a time to share their thoughts, their ideas, their expertise relative to this issue or this decision. Inquire into any sources of confusion or puzzlement or ambiguity. Make sure that we're on the same page. Make sure that people understand each other.

Then start to come to a consensus of what these different bits may mean for the possible decision or course of action and consider how what we're coming up with might play out down the road. You know, think about the implications. And then finally, really check around the room for agreement or possible dissent around the decision that seems to be emerging.

Dissent is OK. Some dissent is almost inevitable, because people have such different expertise. We have to just figure out what amount -- and this is a leadership task -- of dissent we can live with. The dissent comes from the uncertainty. So what we need to do is get out there and act, try things out, so we can learn more, and that will by itself reduce some of the uncertainty.


Wednesday, January 12, 2022

Multifactor Authentication (MFA) and how does it work?


multifactor authentication (MFA)

Multifactor authentication (MFA) is a security technology that requires multiple methods of authentication from independent categories of credentials to verify a user's identity for a login or other transaction. Multifactor authentication combines two or more independent credentials: what the user knows, such as a password; what the user has, such as a security token; and what the user is, by using biometric verification methods.

The goal of MFA is to create a layered defense that makes it more difficult for an unauthorized person to access a target, such as a physical location, computing device, network or database. If one factor is compromised or broken, the attacker still has at least one or more barriers to breach before successfully breaking into the target.

In the past, MFA systems typically relied on two-factor authentication (2FA). Increasingly, vendors are using the label multifactor to describe any authentication scheme that requires two or more identity credentials to decrease the possibility of a cyber attack. Multifactor authentication is a core component of an identity and access management framework. 


Why is multifactor authentication important?

One of the biggest shortcomings of traditional user ID and password logins is that passwords can be easily compromised, potentially costing organizations millions of dollars. Brute-force attacks are also a real threat, as bad actors can use automated password cracking tools to guess various combinations of usernames and passwords until they find the right sequence. Although locking an account after a certain number of incorrect login attempts can help protect an organization, hackers have numerous other methods for system access. This is why multifactor authentication is so important, as it can help reduce security risks.

MFA authentication methods

An authentication factor is a category of credential used for identity verification. For MFA, each additional factor is intended to increase the assurance that an entity involved in some kind of communication or requesting access to a system is who -- or what -- it says it is. The use of multiple forms of authentication can help make a hacker's job more difficult.

The three most common categories, or authentication factors, are often described as something you know, or the knowledge factor; something you have, or the possession factor; and something you are, or the inherence factor. MFA works by combining two or more factors from these categories.

Knowledge factor. Knowledge-based authentication typically requires the user to answer a personal security question. Knowledge factor technologies generally include passwords, four-digit personal identification numbers (PINs) and one-time passwords (OTPs). Typical user scenarios include the following:

  • swiping a debit card and entering a PIN at the grocery checkout;
  • downloading a virtual private network client with a valid digital certificate and logging in to the VPN before gaining access to a network; and
  • providing information, such as mother's maiden name or previous address, to gain system access.

Possession factor. Users must have something specific in their possession in order to log in, such as a badge, token, key fob or phone subscriber identity module (SIM) card. For mobile authentication, a smartphone often provides the possession factor in conjunction with an OTP app.

Possession factor technologies include the following:

  • Security tokens are small hardware devices that store a user's personal information and are used to authenticate that person's identity electronically. The device may be a smart card, an embedded chip in an object, such as a Universal Serial Bus (USB) drive, or a wireless tag.
  • A software-based security token application generates a single-use login PIN. Soft tokens are often used for mobile multifactor authentication, in which the device itself -- such as a smartphone -- provides the possession factor authentication.

Typical possession factor user scenarios include the following:

  • mobile authentication, where users receive a code via their smartphone to gain or grant access -- variations include text messages and phone calls sent to a user as an out-of-band method, smartphone OTP apps, SIM cards and smart cards with stored authentication data; and
  • attaching a USB hardware token to a desktop that generates an OTP and using it to log in to a VPN client.

Inherence factor. Any biological traits the user has that are confirmed for login. Inherence factor technologies include the following Biometric verification methods:

  • retina or iris scan
  • fingerprint scan
  • Voice authentication
  • hand geometry
  • digital signature scanners
  • facial recognition
  • earlobe geometry

Biometric device components include a reader, a database and software to convert the scanned biometric data into a standardized digital format and to compare match points of the observed data with stored data.

Typical inherence factor scenarios include the following:

  • using a fingerprint or facial recognition to access a smartphone;
  • providing a digital signature at a retail checkout; and
  • identifying a criminal using earlobe geometry.
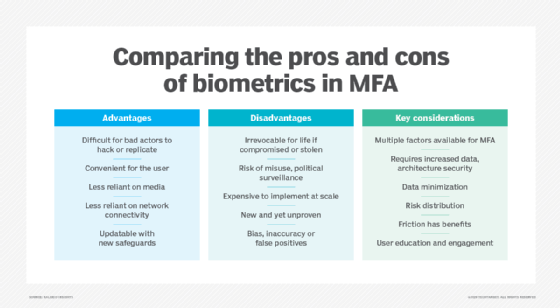
Advantages, disadvantages and key considerations for using biometrics in multifactor authentication
Pros and cons of biometric use in multifactor authentication

User location is often suggested as a fourth factor for authentication. Again, the ubiquity of smartphones can help ease the authentication burden: Users typically carry their phones, and all basic smartphones have Global Positioning System tracking, providing credible confirmation of the login location.

Time-based authentication is also used to prove a person's identity by detecting presence at a specific time of day and granting access to a certain system or location. For example, bank customers cannot physically use their ATM card in the U.S. and then in Russia 15 minutes later. These types of logical locks can be used to help prevent many cases of online bank fraud.

What are the pros and cons of MFA?

Multifactor authentication was introduced to harden security access to systems and applications through hardware and software. The goal was to authenticate the identity of users and to assure the integrity of their digital transactions. The downside to MFA is that users often forget the answers to the personal questions that verify their identity, and some users share personal ID tokens and passwords. MFA has other benefits and disadvantages.

Pros

  • adds layers of security at the hardware, software and personal ID levels;
  • can use OTPs sent to phones that are randomly generated in real time and is difficult for hackers to break;
  • can reduce security breaches by up to 99.9% over passwords alone;
  • can be easily set up by users;
  • enables businesses to opt to restrict access for time of day or location; and
  • has scalable cost, as there are expensive and highly sophisticated MFA tools but also more affordable ones for small businesses.

Cons

  • a phone is needed to get a text message code;
  • hardware tokens can get lost or stolen;
  • phones can get lost or stolen;
  • the biometric data calculated by MFA algorithms for personal IDs, such as thumbprints, are not always accurate and can create false positives or negatives;
  • MFA verification can fail if there is a network or internet outage; and
  • MFA techniques must constantly be upgraded to protect against criminals who work incessantly to break them.

Multifactor authentication vs. two-factor authentication

When authentication strategies were first introduced, the intent was to enforce security but to also keep it as simple as possible. Users were asked to supply only two forms of security keys that would inform a system that they were authentic and authorized users. Common forms of 2FA were user ID and password or automated teller machine (ATM) bank card and PIN.

Unfortunately, hackers quickly discovered ways to buy or break passwords or to skim debit cards at ATMs. This prompted companies and security vendors to look for more hardened forms of user authentication that used additional security factors for verification.


Addressing the challenges of multifactor authentication

Adding security factors to MFA further complicates ease of use for users who must remember multiple passwords. Consequently, the goal of MFA is to simplify MFA techniques for users. Here are three approaches being used to simplify MFA:

  1. Adaptive MFA. This applies knowledge, business rules or policies to user-based factors, such as device or location. For example, a corporate VPN knows that it is OK for a user to sign on from home because it sees the user's location and can determine the risk of misuse or compromise. But an employee who accesses the VPN from a coffee shop will trigger the system and be required to enter MFA credentials.
  2. Single sign-on (SSO). This one-stop authentication method enables users to maintain one account that automatically logs them in to multiple applications or websites with a single ID and password. SSO works by establishing the user's identity and then sharing this information with each application or system that requires it.
  3. Push authentication. This is an automated mobile device authentication technique where the security system automatically issues a third, single-use identification code to the user's mobile device. For example, users who want to access a secured system enter their user ID and password and a security system automatically issues a third, single-use identification code to their mobile device. Users enter that code into the system to gain access. Push authentication simplifies MFA by providing users with a third code, eliminating the need to remember it.
Learn more about application login weaknesses that are often overlooked during penetration testing.

Sunday, October 17, 2021

NetBox Infrastructure Resource Modeling (IRM) application for Automating most Networking operations

The following sections detail how to set up a new instance of NetBox: PostgreSQL database Redis NetBox components Gunicorn HTTP server LDAP authentication (optional)


Thursday, September 23, 2021

Explore JavaScript with below examples

What Can JavaScript Do?

JavaScript can change HTML attribute values.

In this case JavaScript changes the value of the src (source) attribute of an image.

Tuesday, August 18, 2020

Azure Pricing and Support - Understanding

 Important Notes

Azure services lifecycle


  • Remember that Azure keeps on updating their services from time to time. They will add new features of even deploy newer services from time to time.

Refer to the link for all updates to Azure services - https://azure.microsoft.com/en-us/updates/

  • For services in public preview , you can actually view them from the Azure portal itself. These services are available for review for all customers.

  • Note that it is not advisable to deploy resources based on these services to your production environment because there would  be no SLA attached to these services.

  • You can view services in private preview - Here you need to request Microsoft to preview these services.

  • Also keep a note that any services that go out of support , Microsoft will give you at least 12 months of prior notification

You can view these terms via the following link

https://support.microsoft.com/en-us/help/30881

Azure Support Plans

This is very important from the exam perspective

This is very important from an exam perspective.

Please refer to the following link to see all of the support plan options

https://azure.microsoft.com/en-us/support/plans/

Azure Service Level Agreement

Azure normally gives around 99.9% SLA for most of their services

An example for the SLA for Active Directory is given below

Please go to the following link to view the SLA for the various Azure services

https://azure.microsoft.com/en-us/support/legal/sla/summary/

Azure Total Cost of Ownership

To get an idea of the possible total expenses for moving your resources to Azure, you can make use of the Azure Total Cost of

Ownership calculator

Use the following link to work with the TCO calculator - https://azure.microsoft.com/en-us/pricing/tco/calculator/


Azure Core Services - Azure Virtual Machines

 Important Points

Virtual Machines

Let's go through some important points when it comes the topics discussed in this section

1. Choosing the size for the virtual machine - Remember that the size of the virtual machine plays an important role in both the cost and performance you get for your virtual machine.

If you are looking at the Free services provided by Azure - https://azure.microsoft.com/en-us/free/

Here you get 750 hours of compute ONLY free per month ONLY for the B1S VM Size

So if you look at the sizes for Azure virtual machines, this corresponds to just getting 1 vCPU and 1GiB of RAM which is quite less to hosting a workload on the server. Hence please keep this in mind. If you need better performance, you will have to choose a virtual machine size that is outside the boundaries of the Free service.


2. Costing for a virtual machine - Remember that costing for a virtual virtual machine depends on several factors, such as time as it runs for, the region used for hosting the virtual machine, the underlying operating system.

If you don't need the virtual machine running for a certain duration of time, you can always go ahead and stop the virtual machine. This will ensure you don't get charged for the compute cost of the virtual machine.


To ensure you don't get charged for the compute costs for the virtual machine, the virtual machine must be in the Stopped (deallocated) state.

Also keep a note that you will still be charged for other aspects of the virtual machine ( such as the disks attached to the virtual machine) , even if the virtual machine is stopped.


Availability Sets

When you host your virtual machines in Azure, you sometimes need to cater to the following

  1. An unplanned event wherein the underlying infrastructure fails unexpectedly. The failures could be attributed to network failures , local disk failures or even rack failures.


  2. Planned maintenance events , wherein Microsoft needs to make planned updates to the underlying physical environment. In such cases , a reboot might be required on your virtual machine.

You can increase the availability of your application by making use of availability sets. Each virtual machine that is assigned to the availability set is assigned a separate fault and update domain.

Fault domains are used to define the group of virtual machines that share a common source and network switch. You can have up to 3 fault domains.

Update domains are used to group virtual machines and physical hardware that can be rebooted at the same time. You can have up to 20 update domains.

If you deploy two or more virtual machines in an Availability set, you will get a guarantee of virtual machine connectivity to at least one virtual machine 99.95% of the time.

Availability Zones


1. This features help provides better availability for your application by protecting them from datacenter failures.

2. Each Availability zone is a unique physical location in an Azure region.

3. Each zone comprises of one or more data centers that has independent power, cooling, and networking

4. Hence the physical separation of the Availability Zones helps protect applications against data center failures

5. Using Availability Zones, you can be guaranteed an availability of 99.99% for your virtual machines. You need to ensure that you have 2 or more virtual machines running across multiple availability zones

An interesting fact - Does it cost more to use an Availability Zone. Well no, you don't get charged separately for the use of Availability Zones.

Below is an excerpt from the Microsoft documentation

Reference - https://docs.microsoft.com/en-us/azure/availability-zones/az-overview

Azure Core Services - Networking

 Let's go through some important points 

Azure Virtual Network


The Azure Virtual Network service is used to define an isolated network in Azure. The virtual network can then be used to host your resources such as Azure virtual machines.

The Azure virtual network gets assigned an address space which you specify when you create an Azure virtual network

You can then add subnets to your Azure virtual network. This helps divide your network into more logical segments.

An example is shown below of having multiple subnets. You could have one subnet named SubnetA in the virtual network to host your Web servers and another subnet to host the Database servers.

When you create a virtual machine in a virtual network, the virtual machine gets a Private IP address from the address space of the subnet is it launched in.

Network Security Groups

These are used to filter network traffic to and from Azure resources in an Azure virtual network.

A network security group is attached to the network interface attached to the virtual machine.

  • A network security group consists of Inbound rules that are used to control the traffic inbound into a virtual machine

  • By default all traffic into a virtual machine is DENIED.

  • You have explicitly add rules to allow traffic into a virtual machine

  • There are also outbound rules to control the traffic flowing out of the virtual machine. By default all traffic outbound onto the Internet is allowed.

Virtual Network Peering

  • Virtual Network Peering is used to connect two Azure virtual networks together via the backbone network.

  • Azure supports connecting two virtual networks located in the same region or networks located across regions.

  • Once you enable virtual network peering between two virtual networks, the virtual machines can then communicate via their private IP addresses across the peering connection.

  • You can also peer virtual networks that are located across different subscriptions.

  • The virtual networks can't have overlapping CIDR blocks.

Point-to-Site VPN Connection

A Point-to-Site VPN connection is used to establish a secure connection between multiple client machines an an Azure virtual network via the Internet.

Below is a diagram from the Microsoft documentation on a sample scenario

Image reference -https://docs.microsoft.com/en-us/azure/vpn-gateway/vpn-gateway-howto-point-to-site-resource-manager-portal

To implement a Point to Site VPN connection, you need to create a VPN Gateway in Azure.

Site-to-Site VPN Connection

A Site-to-Site VPN connection is used to establish a secure connection between an on-premise network and an Azure network via the Internet.

Below is a diagram from the Microsoft documentation on a sample scenario

Image reference - https://docs.microsoft.com/en-us/azure/vpn-gateway/vpn-gateway-howto-site-to-site-resource-manager-portal

  • On the on-premise side, you need to have a VPN device that can route traffic via the Internet onto the VPN gateway in Azure. The VPN device can be a hardware device like a Cisco router or a software device ( e.g Windows Server 2016 running Routing and Remote services). The VPN device needs to have a publically routable IP address.

  • The subnets in your on-premise network must not overlap with the subnets in your Azure virtual network

  • The Site-to-Site VPN connection uses an IPSec tunnel to encrypt the traffic.

  • The VPN gateway resource you create in Azure is used to route encrypted traffic between your on-premise data center and your Azure virtual network.